The DORA Process in DHCP: Explained

Are you familiar with the term DHCP? If not, DHCP stands for Dynamic Host Configuration Protocol, a network protocol that assigns IP addresses and other network configuration parameters to devices on a network. You can learn in detail about DHCP here. In this blog, we will focus on one of the critical processes involved in DHCP, the DORA process in DHCP. The acronym DORA stands for Discover, Offer, Request, and Acknowledgement, and it represents the four-step process that DHCP clients and servers use to assign IP addresses.
DHCP uses UDP port numbers 67 and 68. Out of these, the services are provided on port number 67 and the client listens on port number 68. It is also based on a client-server model. DHCP works completely on the DORA process.
Without further ado, let’s dive into the details of what’s the need for the DORA process and understand what happens in each step of the DORA process in DHCP.
What is the DORA Process?
Every device that is part of a network needs a unique IP address to communicate with other network devices. These IP addresses are assigned either through Static IP or Dynamic Host Configuration Protocol (DHCP).
The DHCP follows a DORA process to assign IP addresses to the network devices. This process is based on a client-server model and involves an exchange of 4 types of messages:
Discover
Offer
Request
Acknowledgement
Therefore, the DORA process refers to the assignment of dynamic IP addresses to various network devices, clients, and nodes present over the Internet to allow communication between these devices in a network.
Why is the DORA process required?
Suppose that you work in a business organization where you have a DHCP server set up. Some computers are connected through a networking device that is connected to this DHCP server.
Now, if you want to install a new computer to the existing network of other computers, you would need to manually assign an IP address to this computer. This will allow it to become a part of the network to communicate information with other computers.
This is where the role of the DHCP server comes into place. It, therefore, uses the DORA process to assign the IP address to the newly added computer. You must note that to assign the IP address, some configuration changes are needed to be made in the computer.
To do so, DHCP must be enabled in the TCP/IP properties of the computer to obtain a dynamic IP address.
Steps involved in the DORA process in DHCP
Now, let us learn the process of how the IP address is assigned by the DHCP server to the device through the DORA process. This follows 4 major steps.
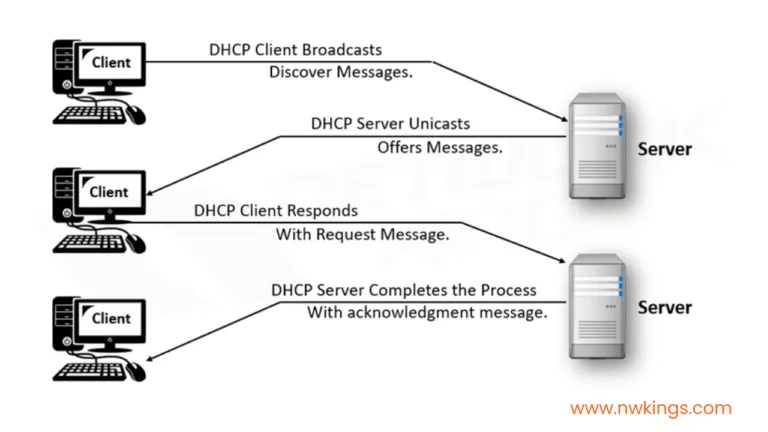
Discover
After the discovery message is accepted by the DHCP server, it sends out the offer message to the client that contains the available IP address that needs to be assigned inside it.
Therefore, the offer message is broadcasted in the network. Since the MAC address of the device that sends the discovery message is noted, the offer message is accepted by the client and rejected by other clients.
The offer message consists of the IP address, subnet mask, domain name servers (DNS), lease duration, and IP address of the DHCP server.
It depends on the client whether it wants to accept or reject the offered IP address.
Request
If the client accepts the offered IP address by the DHCP server, it sends back a request message to the DHCP server to confirm the IP address.
The request message is also broadcasted on the network. Since the message contains the UDP port number 67, it is accepted by the DHCP server while the other clients in the network reject the request message.
The request message contains the offered IP address by the DHCP server.
When the request message is accepted by the DHCP server, it records the assigned IP address along with the MAC address of the particular client in its DHCP table.
Acknowledgement
When the request message is received by the DHCP server, it sends out an ack message (acknowledgement) to the client telling that it has configured the IP address for the client.
The ack message is also broadcasted in the network. It is broadcasted so that if there is any other DHCP server present in the network, it must become aware of the assigned IP address.
The acknowledgement message contains the assigned IP address, subnet mask, lease duration, domain name servers (DNS), and the IP address of the DHCP server.
Conclusion
In this blog, we have summed up the most popular process of assigning the IP address to the client via a DHCP server. The Discover, Offer, Request, and Acknowledge process ensures that devices are assigned unique IP addresses and other network configuration parameters on the network.
You also learned why all the messages are broadcasted in the network. Also, it is done to further enable unicast communication between the client and server.
Understanding the DORA process is essential for network administrators and IT professionals who work with DHCP, as it allows them to troubleshoot network connectivity issues and optimize network performance.
It is also an important concept to learn for individuals appearing for the CCNA or CCNP exam.
FAQs:
01. What happens if a DHCP client does not receive an Acknowledge message?
If a DHCP client does not receive an Acknowledge message, it will retry the Request message several times before giving up and sending a new Discover message.
02. How can I configure a DHCP server?
You can configure a DHCP server on a Windows or Linux server by installing the DHCP server role and configuring the DHCP scope.
03. What is a DHCP scope?
A DHCP scope consists of a range of IP addresses that are available to be assigned to the clients. It makes sure that unique IP addresses are assigned to the client every time.

The founder of Network Kings, is a renowned Network Engineer with over 12 years of experience at top IT companies like TCS, Aricent, Apple, and Juniper Networks. Starting his journey through a YouTube channel in 2013, he has inspired thousands of students worldwide to build successful careers in networking and IT. His passion for teaching and simplifying complex technologies makes him one of the most admired mentors in the industry.

